By default most of Debian-based systems use DHCP dynamic method in order to assign IP Addresses on network interfaces. This tutorial will guide you on how you can assign permanent manual Static IP Address on network cards or create permanent Virtual Network Interfaces in order to assign multiple IP Addresses on physical network devices on Debian-based systems meant to be used as servers which are installed without any Graphical User Interface, such as Ubuntu Server Edition or Debian Minimal Installation.
Although the Static IP Address assignment can be done on the system installation process, most of the system administrators prefer using DHCP method on the installation process and manually assign the IP Addresses after the system is configured and ready for production.
PART ONE – Permanent Static IP Address Assignment
The procedure of configuring a static IP Address on Debian-based systems consist in modifying the appropriate network interface entry on /etc/network/interfaces file and change the inet statement from dhcp to static along with adding the main network values such as Address, Netmask, and Gateway. Besides this values you can also add optional values for Network address, network Brodcast address and DNS resolvers, such as nameservers and dns-search lists.
1. The first step in order to manually assign a Static IP Address on a network interface is to open /etc/network/interfaces file for editing with a text editor, preferably nano, by issuing the following command:
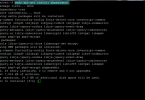
sudo nano /etc/network/interfaces 2. After the file is open for editing, modify the appropriate Network Interface Card inet statement from dhcp to static (this example uses eth0 inferface) and add all your custom network values as in the below excerpt:
auto eth0
iface eth0 inet static
      address 192.168.1.90
      netmask 255.255.255.0
      network 192.168.1.0
      brodcast 192.168.1.255
      gateway 192.168.1.1
      dns-nameservers 192.168.1.1 8.8.8.8
      dns-search mydomain.lan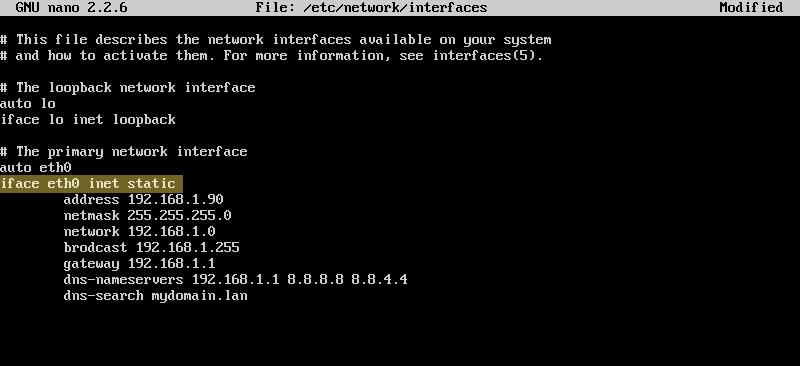
The last two values used here, dns-nameservers and dns-search, which points to DNS nameserver resolvers, are optional and can be skipped because the system can use /etc/resolv.conf file in order to resolv domain names.
3. When you’re done finishing editing, save and exit the file (hit CTRL+O to save and CTRL+X to exit if you are using nano editor), then apply changes by disabling and enabling the interface using the following commands:
sudo ifdown eth0
sudo ifup eth0
Thats’ it! Now your NIC is configured with permanent static IP Addresses. To get your network interfaces values just run ifconfig command and ping the appropriate NIC address value from a different host in your LAN to see if it replies.
The same procedure can be used to permanently edit all your network interfaces, in case your machine has multiple NIC’s attached.
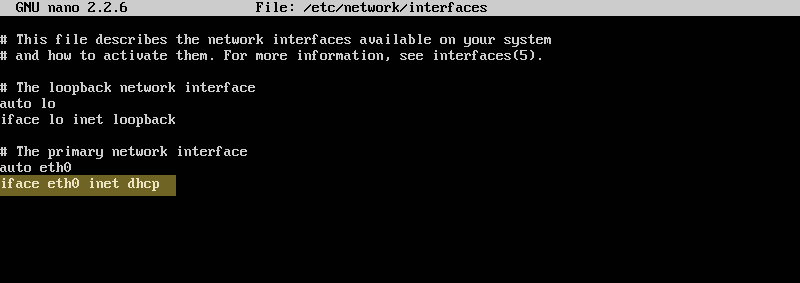
4. In case you want to revert changes and use the DHCP method for an interface, remove or comment address, netmask, gateway, network, brodcast, dns-nameservers and dns-search custom values and replace inet statement from static to dhcp as illustrated in the below screenshot.
PART TWO – Permanent Virtual Network Interface
Virtual Network Interface or Alias Interface is a method used to assign more than one IP Address to a single physical network interface in order for your system to be reachable via the IP configured on that physical interface from external hosts or networks. This technique can be helpful in case you are running a virtual hosting webserver with Apache or Nginx or your machine acts a router with multiple routing protocols.
The main condition in order to use this method and configure multiple IP Addresses on an system interface is that the interface must physically exists in your machine.
The creation of an permanent Alias Network Interface is presented below and involves the editing of the same network interfaces file as for Static IP assignment and adding the same network values as presented above but with a different IP or sets of IP addresses in case you are configuring aliases for a different network.
1. First, open network interfaces file for editing by issuing the following command:
sudo nano /etc/network/interfaces
2. Once the file is open for editing, locate your Physical Network Interface name (eth0, eth1 etc) for which you will add and extra IP Address (in case you have multiple NICs attached to your machine) and create the Alias Interface using the same name as the main physical interface followed by alias order number (the alias notation starts with 0 on Linux)
Ex:
eth0:0 = First Alias Network Interface for eth0
eth0:1 = Second Alias Network Interface for eth0
eth1:2 = Third Alias Network Interface for eth1 and so on…
Use the below file excerpt and screenshot to create Alias Interface and add your custom network values – replace the IP Addresses accordingly:
auto eth0:0
iface eth0:0 inet static
        address 192.168.1.95
        netmask 255.255.255.0
        network 192.168.1.0
        brodcast 192.168.1.255
        gateway 192.168.1.1 #only if you are using a different gateway than the main physical interface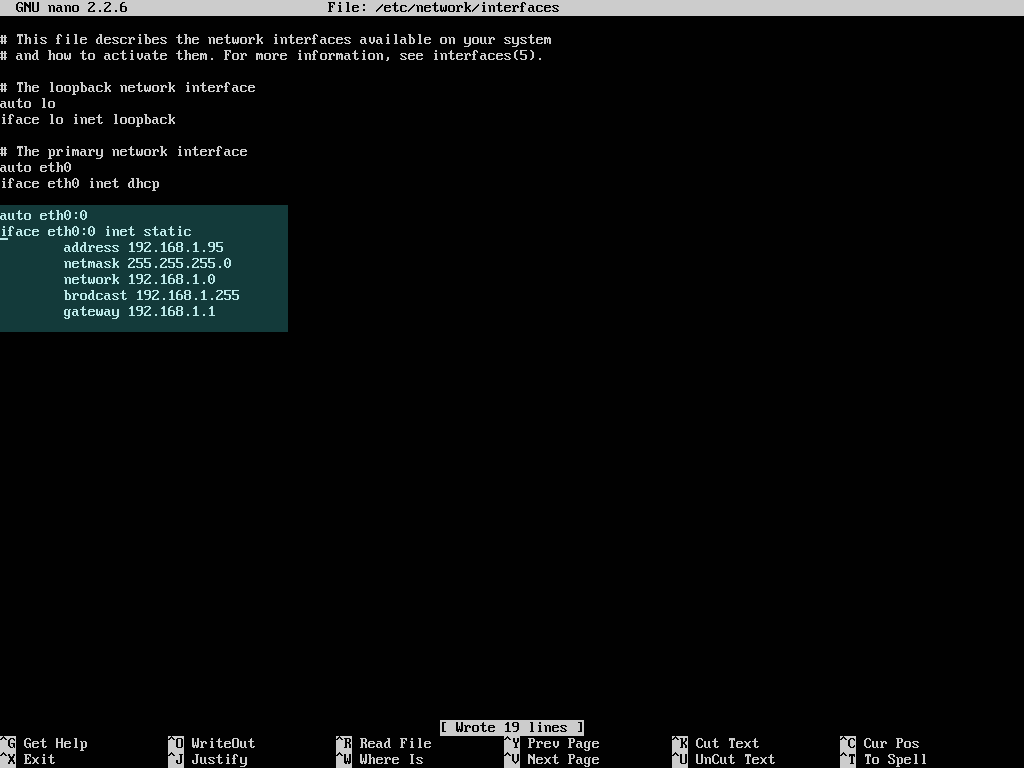
Be aware that DHCP dynamic method of assigning IP configurations on Alias Interfaces does not work by default if the main physical interface uses DHCP inet statement because the DHCP server will offer the same IP configurations as for main physical network interface, so one of the interface (physical or virtual) must be configured with DHCP and the other with static method.
Also, if this Virtual Network Interface will exit internal network through the same gateway Address IP as the main physical network device, skip and don’t use gateway value on its configurations.
3. After editing the file with the appropriate Alias Interface network settings, save it and exit, then activate the interface by issuing the following command.
sudo ifup eth0:0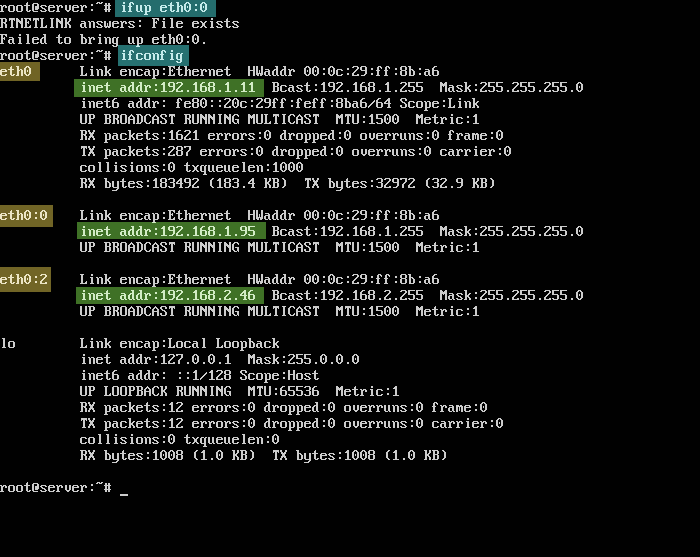
To view interface state and configurations run ifconfig command.
In case you use the same gateway here as for the main physical interface an Failed to bring up eth0:0 error message should appear on your screen. Don’t need to worry about this error message because the alias interface it’s active and the message is generated due to the fact that the same route already exist on kernel table.
4. To deactivate the interface run the following command:
sudo ifdwon eth0:0That’ it! Using the procedure presented here you can add as much multiple IP addresses as you need to all your physical network devices attached to your machine and all of the configurations should now be permanent on your system, surviving every reboot.


I suspect “brodcast” is a typo.