Apache Authentication represents a server method which requires visitors to enter a username and a password in order to access different web resources. This type of authentication is different than HTML login forms which is based on server-side scripts written in dynamic programming languages that interacts with various databases in order to provide an authentication mechanism on a specific website or a web page.
Although Apache uses different authentication mechanisms, this tutorial will only cover Auth_Basic type with passwords stored on local .htpasswd files and Authnz_external type which allows local system users to perform logins on protected web resources.
As terminology, a web resource that Apache can handle in this cases can be a directory or a web file.
Apache Basic Authentication using .htpasswd file
This type of authentication directives can be placed inside the following statements blocks: <Directory>, <Files> and <Location> on the main Apache configuration file or on Virtual Hosts configuration files and protects all sub-directories and files within the main directory. In case you are using .htaccess files for Virtual Hosts an AllowOverride All or AllowOverride AuthConfig statement must be placed inside the aboves directives blocks on the sites-enabled configuration file as in the following example:
<Directory />
AllowOverride AuthConfig
</Directory>
1. In order to manipulate basic .htpasswd authentication files , first issue the following command to install apache2-utils package:
sudo apt-get install apache2-utils2. Then, suppose you want to store all your credential files on a dedicated hidden directory named .passwords inside /etc/apache2/ system path, issue the mkdir command to create the directory:
sudo mkdir /etc/apache2/.passwords3. The last step is to create an .htpasswd hidden file named .htpass on the above location and add a first user by issuing the below command:
sudo htpasswd -c /etc/apache2/.passwords/.htpass first_username
create .htpasswd first user
Enter your username password twice and the file should now be created. If you want to add extra usernames repeat the above step but make sure you remove the -c command switch:
sudo htpasswd /etc/apache2/.passwords/.htpass second_usernameTo remove a username form the file issue the command with the -D switch as in the below example:
sudo htpasswd -D /etc/apache2/.passwords/.htpass second_username4. Now, suppose you have a virtual host configuration file named ubuntu.lan.conf on /etc/apache2/sites-available/ system path with the webroot pointing to /var/www/html/ubuntu.lan directory and you want to protect the entire website using Apache Authentication, add the following block on the ubuntu.lan.conf configuration file:
sudo nano /etc/apache2/sites-availabe/ubuntu.lan.confApache Authentication block statements:
<Directory "/var/www/html/ubuntu.lan">
    AuthType Basic
    AuthName "Restricted Files"
    AuthBasicProvider file
    AuthUserFile /etc/apache2/.passwords/.htpass
    Require valid-user
</Directory>
If you want to password protect just a specific file from your website use the Virtual Host’s DocumentRoot relative path of the file within the following block (in this example the absolute /var/www/html/ubuntu.lan/mysql.cgi file is password protected):
<Files mysql.cgi>
    AuthType Basic
    AuthName "Restricted Files"
    AuthBasicProvider file
    AuthUserFile /etc/apache2/.passwords/.htpass
    Require valid-user
</Files>
For <Location> statement use the DocumentRoot relative path to the protected directory as in the following example (the absolute /var/www/html/ubuntu.lan/secret directory is password protected):
<Location /secret>
    AuthType Basic
    AuthName "Restricted Files"
    AuthBasicProvider file
    AuthUserFile /etc/apache2/.passwords/.htpass
    Require valid-user
</Location>
For <Directory> blocks use the absolute system path to password protect a directory that resides on your website webroot as in the following example:
<Directory "/var/www/html/ubuntu.lan/secret">
     AuthType Basic
     AuthName "Restricted Files"
     AuthBasicProvider file
     AuthUserFile /etc/apache2/.passwords/.htpass
     Require valid-user
</Directory>
Notice the system paths used for <Location>, <Directory> and <Files> from the above excerpts, especially the <Files> directive for witch you don’t have to enter the / special notation sign.
Now, let’s examine the password authentication mechanism statements individually:
-
AuthType tells Apache to use Basic Authentication.
-
AuthName is the message displayed by the browser on the password prompt.
-
AuthUserFile represents the path for your
.htpasswdfile
- Require valid-user tells Apache that only authenticated users found on
/etc/apache2/.passwords/.htpassfile will be granted access to access a web resource.
The Require valid-user directive can be used to allow only a limited number of users from an .htpasswd file to access a password protected web resource by enumerating them individually:
Require valid-user user1 user2 user5You can also use a group file to allow access to multiple users by creating group file with the below configuration and add AuthGroupFile statement on the Apache password protected resource block from the configuration file.
sudo nano /etc/apache2/.passwords/.groups.groups file excerpt:
Allowed_Users: user1 user5 user11Apache block excerpt for a web protected resource:
<Directory "/var/www/html/ubuntu.lan/secret">
AuthType Basic
AuthName "Restricted Files"
AuthBasicProvider file
AuthUserFile /etc/apache2/.passwords/.htpass
AuthGroupFile /etc/apache2/.passwords/.groups
Require group Allowed_Users
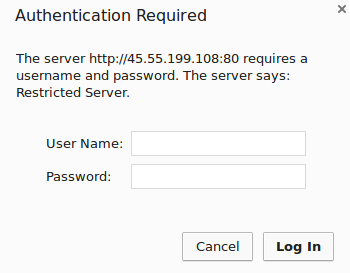
</Directory>5. After the changes are made, restart Apache daemon to apply changes and test the configuration by visiting your website. A prompt demanding for your username and password should appear on your browser as in the following screenshot.

Apache Browser Authorization
For .htaccess files in case you want to protect the entire website from the root add the same configurations as explained above and just skip the <Directory> statement:
sudo nano /var/www/html/ubuntu.lan/.htaccess.htaccess file excerpt:
AuthType Basic
AuthName "Restricted Website"
AuthBasicProvider file
AuthUserFile /etc/apache2/.passwords/.htpass
Require valid-user
Apache External Authentication using Local System Users Accounts
1. In order for Apache to allow access to a web resource for Linux local system accounts you need to install the mod_authnz_external Apache module and the pwauth program which acts on his own, being responsible with authenticate system users through PAM authentication modules.
sudo apt-get install libapache2-mod-authnz-external pwauth2. After the packages are installed on your system, place the following block statements on your website configuration file as described above for Apache Basic Authentication mechanism:
AddExternalAuth pwauth /usr/sbin/pwauth
SetExternalAuthMethod pwauth pipe

<Directory "/var/www/html/ubuntu.lan">
AuthType Basic
AuthName "PAM Authentication"
AuthBasicProvider external
AuthExternal pwauth
require valid-user
</Directory>
Apache block statements for PAM authentication
3. In order to enable Apache External Authentication activate the authnz_external module and restart Apache service to reflect changes by issuing the below commands:
sudo a2enmod authnz_external
sudo service apache2 restart
4. To test the configuration visit your website address and a browser pop-up should appear on your screen. To authenticate on the website just enter a valid local system account credentials and you should be allowed to further browse the website.

Apache PAM Authentication
Using these two Apache Authentication mechanisms can provide an extra security layer for your website by protecting different web resources from malicious attacks and direct such types of failed attempts to especially created web files using ErrorDocument 401 server response.