On this tutorial we will go through the Install Nginx, PHP-FPM, MariaDB on Ubuntu 22.04 Jammy Jellyfish Linux. Nginx is a fast & high perfromance web server, PHP is the most popular programming language of the web, and MySQL is the most used database server, that combination makes what we call LEMP stack (Linux, Nginx, MySQL/MariaDB and PHP).
On this how to, we will configure Nginx to handle the PHP dynamic files to PHP-FPM daemon, which is a fastcgi backend that will process all the PHP information. On Ubuntu 22.04, PHP-FPM binaries are available by default, so there is no need to install extra repositories into your system.
Install Nginx
Step 1: Install Nginx
Nginx is part of the default Ubuntu 22.04 repositories, so install Nginx is a simple task:
sudo apt update
sudo apt install nginx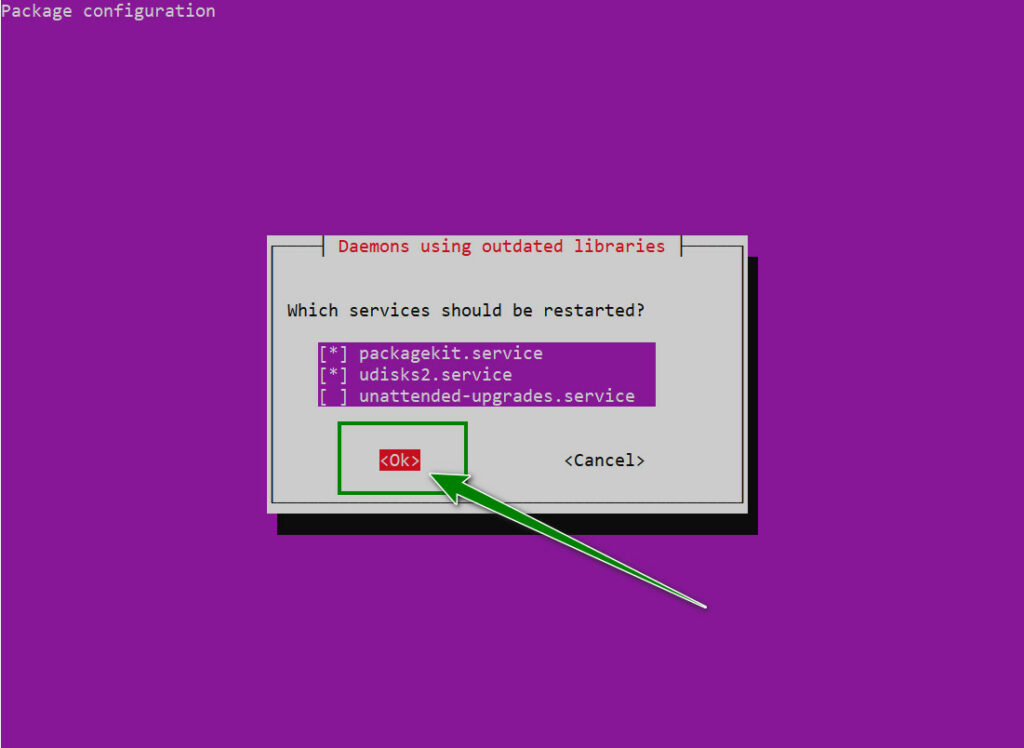
This will install the Nginx web server and start the service. We can enable Nginx to auto-start at boot time by running the following command.
sudo systemctl enable nginxNow, you check nginx status.
LinuxTutorials@Ubuntu-22-04:~# sudo systemctl status nginx
● nginx.service - A high performance web server and a reverse proxy server
     Loaded: loaded (/lib/systemd/system/nginx.service; enabled; vendor preset: enabled)
     Active: active (running) since Mon 2022-09-12 09:06:39 UTC; 3min 0s ago
       Docs: man:nginx(8)
    Process: 41827 ExecStartPre=/usr/sbin/nginx -t -q -g daemon on; master_process on; (code=exited>
    Process: 41828 ExecStart=/usr/sbin/nginx -g daemon on; master_process on; (code=exited, status=>
   Main PID: 41917 (nginx)
      Tasks: 2 (limit: 1033)
     Memory: 6.3M
        CPU: 32ms
     CGroup: /system.slice/nginx.service
             ├─41917 "nginx: master process /usr/sbin/nginx -g daemon on; master_process on;"
             └─41920 "nginx: worker process" "" "" "" "" "" "" "" "" "" "" "" "" "" "" "" "" "" "" >

Sep 12 09:06:39 LinuxLaptop systemd[1]: Starting A high performance web server and a reverse proxy >
Sep 12 09:06:39 LinuxLaptop systemd[1]: Started A high performance web server and a reverse proxy s>
– “Enabled“: indicates that auto-start at boot time is enabled and we can see that Nginx is running.
– “Memory: 6.3M“: indicates that how much RAM Nginx is using from the output.
– If the above command doesn’t immediately quit after running. You need to press “q” to make it quit.
Check Nginx version.
nginx -v
nginx version: nginx/1.18.0 (Ubuntu)
Step 2: Open HTTP/HTTPS Port on UFW Firewall or iptables
On UFW firewall:
Now you need to allow the web server ports in the firewall. To allow ports 80 and 443 in the UFW firewall, execute the following commands.
sudo ufw allow 80/tcp
sudo ufw allow 443/tcp
On iptables
If you are using iptables firewall, then you need to run the following command to open TCP port 80 and 443.
sudo iptables -I INPUT -p tcp --dport 80 -j ACCEPT
sudo iptables -I INPUT -p tcp --dport 443 -j ACCEPT
Step 3: Test nginx default page
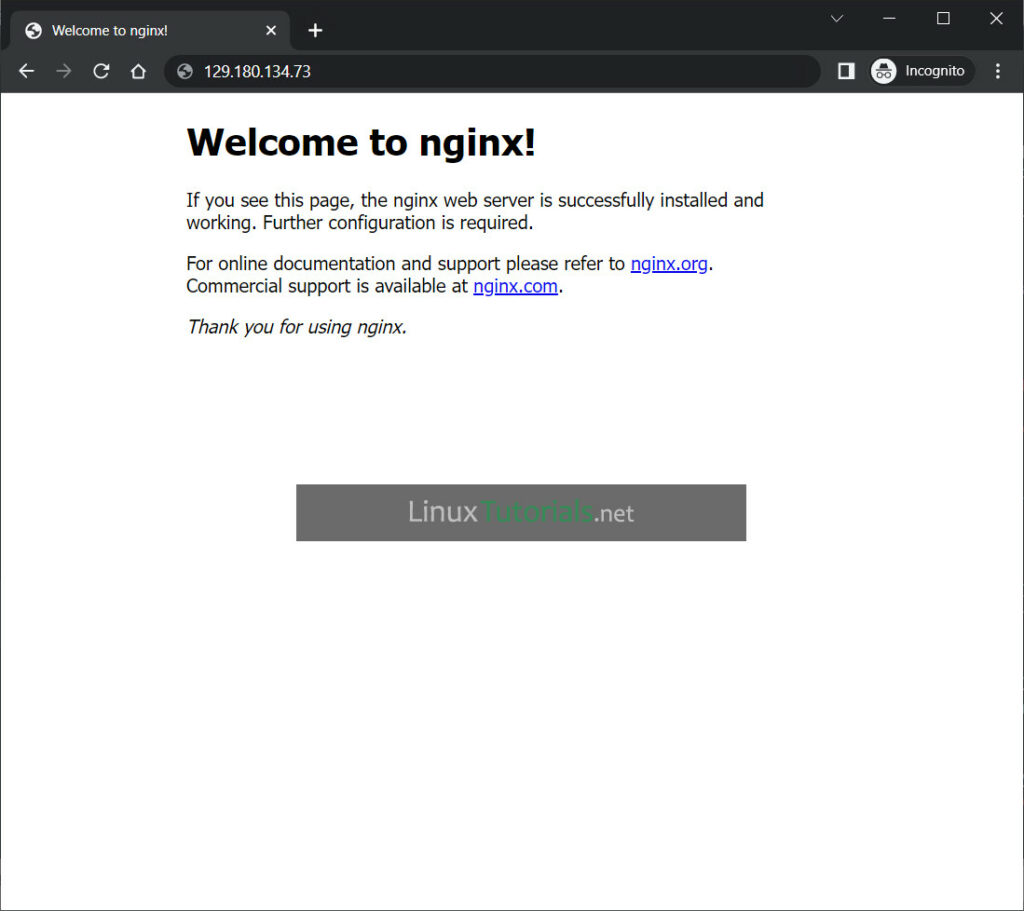
Open a web browser on your system or your PC and enter the http://[ServerIP/hostname]/ in the address bar. You will get default Nginx server page:
Install MariaDB Database Server
Step 1: Install MariaDB Database Server
MariaDB is an alternative to MySQL. It was developed by former members of the MySQL team, who were concerned that Oracle might turn MySQL into a closed source product.
sudo apt install mariadb-server mariadb-clientPress Enter to continue the installation

Once MariaDB is installed, the service will be up and running. You can manage the service with the following commands.
sudo systemctl start mariadb
systemctl stop mariadb
systemctl restart mariadb
systemctl enable mariadb
systemctl disable mariadb
systemctl status mariadb
● mariadb.service - MariaDB 10.6.7 database server Loaded: loaded (/lib/systemd/system/mariadb.service; enabled; vendor preset: enabled) Active: active (running) since Wed 2022-08-31 02:58:36 UTC; 6s ago Docs: man:mariadbd(8) https://mariadb.com/kb/en/library/systemd/ Process: 17995 ExecStartPre=/usr/bin/install -m 755 -o mysql -g root -d /var/run/mysqld (code=exited, status=0/SUCCESS) Process: 17996 ExecStartPre=/bin/sh -c systemctl unset-environment _WSREP_START_POSITION (code=exited, status=0/SUCCESS) Process: 17998 ExecStartPre=/bin/sh -c [ ! -e /usr/bin/galera_recovery ] && VAR= || VAR=`cd /usr/bin/..; /usr/bin/galera_recovery`; [ $? -eq 0 ] && systemctl set-e> Process: 18037 ExecStartPost=/bin/sh -c systemctl unset-environment _WSREP_START_POSITION (code=exited, status=0/SUCCESS) Process: 18039 ExecStartPost=/etc/mysql/debian-start (code=exited, status=0/SUCCESS) Main PID: 18027 (mariadbd) Status: "Taking your SQL requests now..." Tasks: 11 (limit: 1029) Memory: 58.9M CPU: 485ms CGroup: /system.slice/mariadb.service └─18027 /usr/sbin/mariadbd Aug 31 02:58:36 LinuxtuTorials mariadbd[18027]: Version: '10.6.7-MariaDB-2ubuntu1.1' socket: '/run/mysqld/mysqld.sock' port: 3306 Ubuntu 22.04
To enable MariaDB to automatically start at boot time, run
sudo systemctl enable mariadbStep 2: Security Configuration for MariaDB
After installation, make sure you secure the server database. This includes:
- When it asks you to enter MariaDB root password, press Enter key as the root password isn’t set yet.
- Don’t switch to unix_socket authentication because MariaDB is already using unix_socket authentication.
- Don’t change the root password, because you don’t need to set root password when using unix_socket authentication.
- Remove anonymous users
- Disable remote login for root user.
- Eliminate database checks and access to it
Run the command below to secure your database server.
sudo mysql_secure_installationNOTE: RUNNING ALL PARTS OF THIS SCRIPT IS RECOMMENDED FOR ALL MariaDB
SERVERS IN PRODUCTION USE! PLEASE READ EACH STEP CAREFULLY!
In order to log into MariaDB to secure it, we'll need the current
password for the root user. If you've just installed MariaDB, and
haven't set the root password yet, you should just press enter here.
Enter current password for root (enter for none): [Press Enter]
OK, successfully used password, moving on...
Setting the root password or using the unix_socket ensures that nobody
can log into the MariaDB root user without the proper authorisation.
You already have your root account protected, so you can safely answer 'n'.
Switch to unix_socket authentication [Y/n] n
... skipping.
You already have your root account protected, so you can safely answer 'n'.
Change the root password? [Y/n] n
... skipping.
By default, a MariaDB installation has an anonymous user, allowing anyone
to log into MariaDB without having to have a user account created for
them. This is intended only for testing, and to make the installation
go a bit smoother. You should remove them before moving into a
production environment.
Remove anonymous users? [Y/n] Y
... Success!
Normally, root should only be allowed to connect from 'localhost'. This
ensures that someone cannot guess at the root password from the network.
Disallow root login remotely? [Y/n] y
... Success!
By default, MariaDB comes with a database named 'test' that anyone can
access. This is also intended only for testing, and should be removed
before moving into a production environment.
Remove test database and access to it? [Y/n] y
- Dropping test database...
... Success!
- Removing privileges on test database...
... Success!
Reloading the privilege tables will ensure that all changes made so far
will take effect immediately.
Reload privilege tables now? [Y/n] y
... Success!
Cleaning up...
All done! If you've completed all of the above steps, your MariaDB
installation should now be secure.
Thanks for using MariaDB!
Check Mariadb version.
mariadb --version
mariadb  Ver 15.1 Distrib 10.6.7-MariaDB, for debian-linux-gnu (x86_64) using  EditLine wrapper
Install PHP-FPM 8.1
PHP8.1 is included in Ubuntu 22.04 repository and has a minor performance improvement over PHP8.0. Enter the following command to install PHP8.1 and some common extensions.
Now, install PHP 8.1 and PHP extensions are commonly needed for content management systems (CMS) like WordPress:
sudo apt install php8.1 php8.1-fpm php8.1-mysql php-common php8.1-cli php8.1-common php8.1-opcache php8.1-readline php8.1-mbstring php8.1-xml php8.1-gd php8.1-curlInstalling these PHP extensions ensures that your CMS runs smoothly. Now start php8.1-fpm.
sudo systemctl start php8.1-fpmEnable auto-start at boot time.
sudo systemctl enable php8.1-fpmOnce the installation is done, check the service status:
sudo systemctl status php8.1-fpm● php8.1-fpm.service - The PHP 8.1 FastCGI Process Manager Loaded: loaded (/lib/systemd/system/php8.1-fpm.service; enabled; vendor preset: enabled) Active: active (running) since Tue 2022-08-30 08:39:26 UTC; 10s ago Docs: man:php-fpm8.1(8) Process: 9947 ExecStartPost=/usr/lib/php/php-fpm-socket-helper install /run/php/php-fpm.sock /e> Main PID: 9944 (php-fpm8.1) Status: "Processes active: 0, idle: 2, Requests: 0, slow: 0, Traffic: 0req/sec" Tasks: 3 (limit: 1029) Memory: 7.2M CPU: 41ms CGroup: /system.slice/php8.1-fpm.service ├─9944 "php-fpm: master process (/etc/php/8.1/fpm/php-fpm.conf)" "" "" "" "" "" "" "" > ├─9945 "php-fpm: pool www" "" "" "" "" "" "" "" "" "" "" "" "" "" "" "" "" "" "" "" ""> └─9946 "php-fpm: pool www" "" "" "" "" "" "" "" "" "" "" "" "" "" "" "" "" "" "" "" ""> Aug 30 08:39:26 LinuxtuTorials systemd[1]: Starting The PHP 8.1 FastCGI Process Manager... Aug 30 08:39:26 LinuxtuTorials systemd[1]: Started The PHP 8.1 FastCGI Process Manager.
Create an Nginx Server Block
An Nginx server block is like a virtual host in Apache. We will not use the default server block because it’s inadequate to run PHP code and if we modify it, it becomes a mess. So remove the default symlink in sites-enabled directory by running the following command. (It’s still available as /etc/nginx/sites-available/default.)
sudo rm /etc/nginx/sites-enabled/defaultThen use a command-line text editor like Nano to create a new server block file under /etc/nginx/conf.d/ directory.
sudo nano /etc/nginx/conf.d/default.confPaste the following text into the file. The following snippet will make Nginx listen on IPv4 port 80 and IPv6 port 80 with a catch-all server name.
server {
  listen 80;
  listen [::]:80;
  server_name _;
  root /usr/share/nginx/html/;
  index index.php index.html index.htm index.nginx-debian.html;

  location / {
    try_files $uri $uri/ /index.php;
  }

  location ~ \.php$ {
    fastcgi_pass unix:/run/php/php8.1-fpm.sock;
    fastcgi_param SCRIPT_FILENAME $document_root$fastcgi_script_name;
    include fastcgi_params;
    include snippets/fastcgi-php.conf;
  }

 # A long browser cache lifetime can speed up repeat visits to your page
  location ~* \.(jpg|jpeg|gif|png|webp|svg|woff|woff2|ttf|css|js|ico|xml)$ {
       access_log        off;
       log_not_found     off;
       expires           360d;
  }

  # disable access to hidden files
  location ~ /\.ht {
      access_log off;
      log_not_found off;
      deny all;
  }
}
Save and close the file. (To save a file in Nano text editor, press Ctrl+O, then press Enter to confirm. To exit, press Ctrl+X.)
Then test Nginx configurations.
sudo nginx -tIf the test is successful, reload Nginx.
sudo systemctl reload nginxTest PHP
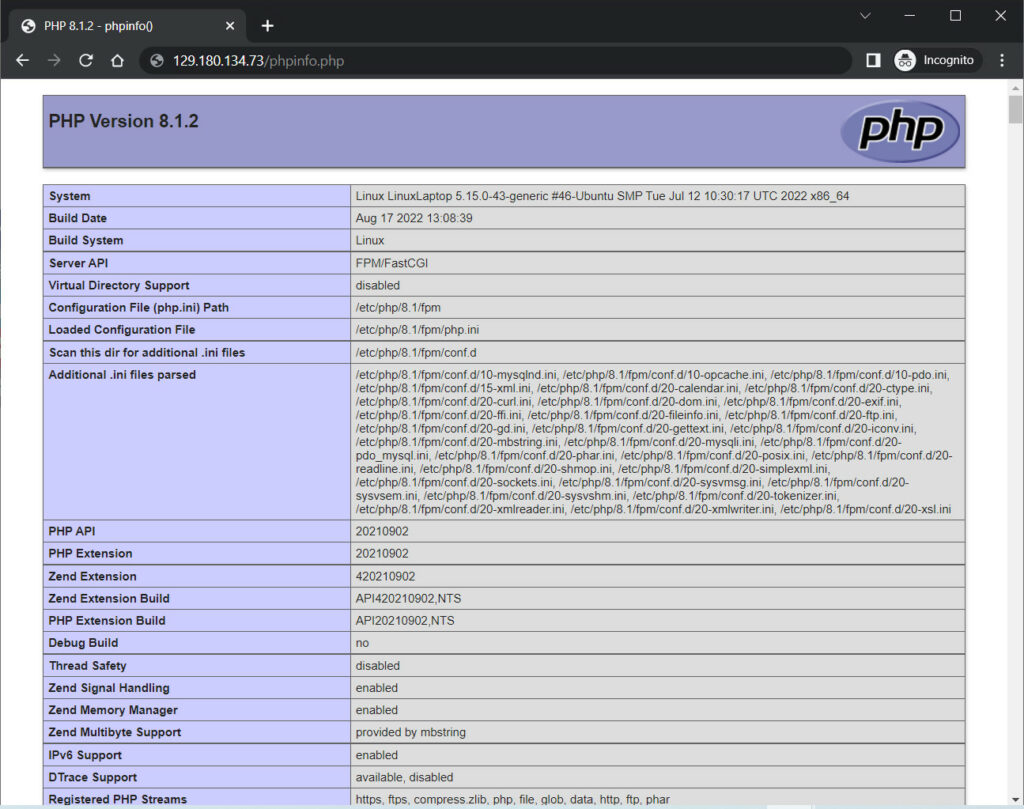
In folder /usr/share/nginx/html/, create a php file (phpinfo.php) with the function <?php phpinfo(); ?> to check PHP.
sudo nano /usr/share/nginx/html/phpinfo.phpPaste the following PHP code into the file.
<?php phpinfo(); ?>Save (Ctrl+O) and close (Ctrl+X) the file.
Open a web browser on your PC and enter the http://[ServerIP/hostname]/phpinfo.php in the address bar. You will get info PHP server page:
Conclusion
LinuxTutorials hope this tutorial helped you to install LEMP stack on Ubuntu 22.04 LTS. If you have any suggestions, you can leave a comment below. Alternatively you may also want to install phpMyAdmin, which is a free web-based database management tool.