Virtual Hosts represents a mechanism in which Apache can serve different web content based on separate IP Addresses (IP-based Vhosts) or serve multiple websites or domains and subdomains based on a single IP Address or network interface (Name-based Vhosts).
Apache Name-based Virtual Hosts on Internet works hand-in-hand with the DNS server, which is responsible with mapping domains to the correct IP Addresses, the duty of Apache HTTP Server being to recognize and redirect the specified domain included on ServerName directive to the DocumentRoot system path on the filesystem where the web content files are hosted.
This article will guide you how you can create and enable Apache Name-based Virtual Hosts on Ubuntu 14.10 in order to serve multiple private domains on your LAN, with the specific web files hosted on different system paths through your system.
STEP ONE – Create Virtual Host Configuration File
1. The simplest method to create a new configuration file in order to be used for the new Virtual Host is to copy the Apache virtual host default configuration file named 000-default.conf, which can be found on /etc/apache2/sites-available/ system path and make the further adjustments to serve the domain content. Assuming that new domain will be called ubuntu.lan ,issue the following command to create the new virtual host file for ubuntu.lan domain, which will be based on the configurations found on the default vhost configuration file:
sudo cp /etc/apache2/sites-available/000-default.conf /etc/apache2/sites-available/ubuntu.lan.conf
2. Next, open the new created file, ubuntu.lan.conf, with an text editor and add or modify the following main directives to match your custom vhost settings:
sudo nano /etc/apache2/sites-available/ubuntu.lan.confServerName www.domain.tld
ServerAlias domain.tld *.domain.tld
DocumentRoot /your/web/content/path
The final virtual host configuration should look like in the below file excerpt:
<VirtualHost *:80>
        ServerAdmin [email protected]

	ServerName www.ubuntu.lan
	ServerAlias ubuntu.lan

	DocumentRoot /var/www/html/ubuntu.lan

    <Directory "/var/www/html/ubuntu.lan">
	Options Indexes
	DirectoryIndex index.php index.html
        AllowOverride All
        Order allow,deny
        Allow from all
    </Directory>

	ErrorLog ${APACHE_LOG_DIR}/ubuntu.lan-error.log
	CustomLog ${APACHE_LOG_DIR}/ubuntu.lan-access.log combined

</VirtualHost>
As you can see from this excerpt, some customizations had been applied to Log files also, in order to write both virtual host log priority messages to two different files matching your domain name vhost: ubuntu.lan-error.log and ubuntu.lan-access.log.
For extra customizations concerning logs you can create separate directories named after your domain name on /var/log/apache2/ system path and instruct the server to write the logs on that location. An example on how to write log files in this manner for a Virtual Host is presented below:
<VirtualHost *:80>
        ServerAdmin [email protected]

	ServerName www.ubuntu.lan
	ServerAlias ubuntu.lan
	DocumentRoot /var/www/html/ubuntu.lan

    <Directory "/var/www/html/ubuntu.lan">
	Options Indexes
	DirectoryIndex index.php index.html
        AllowOverride All
        Order allow,deny
        Allow from all
    </Directory>

	ErrorLog ${APACHE_LOG_DIR}/ubuntu.lan/error.log
	CustomLog ${APACHE_LOG_DIR}/ubuntu.lan/access.log combined

</VirtualHost>
The only thing remained after you have instructed the Virtual Host to write logs to other location is to manually create the logs directory for that domain by issuing the following command:
sudo mkdir /var/log/apache2/ubuntu.lan3. In case you have changed the DocumentRoot directive to other directory in your system which does not exists by default, then you need to create this directory by issuing the following command (replace your DocumentRoot path accordingly):
sudo mkdir -p /var/www/html/ubuntu.lan
In this case the new virtual host web content resides on /var/www/html/ubuntu.lan system path.
STEP TWO – Enable the New Virtual Host
4. The last step needed in order to use the new virtual host is to activate it with the help of a2ensite Apache command line utility (replace your virtual host file accordingly):
sudo a2ensite ubuntu.lan.conf
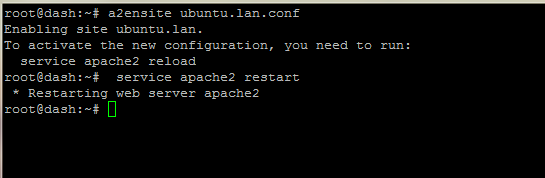
enable virtual host
To disable a virtual host use the a2dissite Apache utility followed by your virtual host file name ending in .conf extension.
5. After you’re finished, restart Apache daemon in order to apply the new changes, then test your configuration by opening a browser and direct it to your DNS domain record or domain alias record (www), which should now point to the same web page.
sudo service apache2 restart
http://www.ubuntu.lan
http://ubuntu.lan
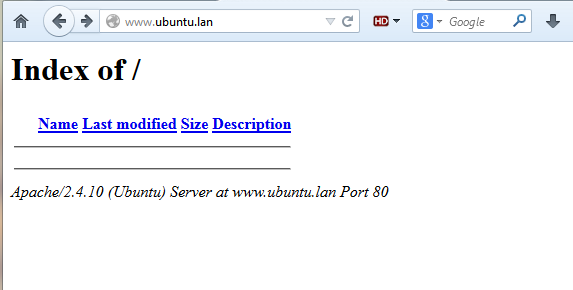
alias domain default page
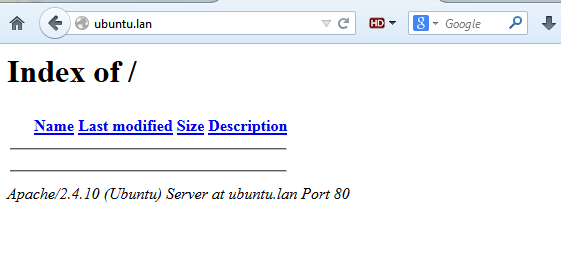
domain default page
FINAL NOTE
An important statement that you should take into consideration, in case you are planning to use multiple virtual hosts and you need to change the DocumentRoot location from /var/www/ to other system path (/srv/www/html/domain_name for example), would be to use the Require all granted line on Access Controls Directory directive as shown in the below example:
<VirtualHost *:80>
        ServerAdmin webmaster@localhost
        ServerName www.mysite.lan
        ServerAlias mysite.lan

        DocumentRoot /srv/www/mysite.lan

  <Directory "/">
        Options Indexes
        DirectoryIndex index.html index.php
        AllowOverride All
        Order allow,deny
        Allow from all
    Require all granted
  </Directory>

        ErrorLog ${APACHE_LOG_DIR}/mysite.lan-error.log
        CustomLog ${APACHE_LOG_DIR}/mysite.lan-access.log combined

</VirtualHost>
That’s it! Using the same mechanism you can now create additional name-based virtual hosts in order to handle multiple domains or subdomains, the only limit that you should take into consideration being your server’s hardware resources.