PhpMyAdmin is an Open Source administrative web interface for MySQL server written in PHP designed for users to easily interact and perform MySQL database tasks such as manage databases users and permissions, create, modify or delete databases or execute SQL statements.
This tutorial will provide a short guide on how you can install and secure PhpMyAdmin web interface on Ubuntu 14.10 by changing Setup directory username and password and moving the web administration interface URL address from non-secure HTTP transactions to a dedicated SSL Virtual Host which will use a custom DNS subdomain entry.
STEP ONE – Install PhpMyAdmin
1. To install PhpMyAdmin on Ubuntu 14.10 from the distribution repositories binary packages, use the apt-get Package Management Tool by issuing the following command:
sudo apt-get install phpmyadmin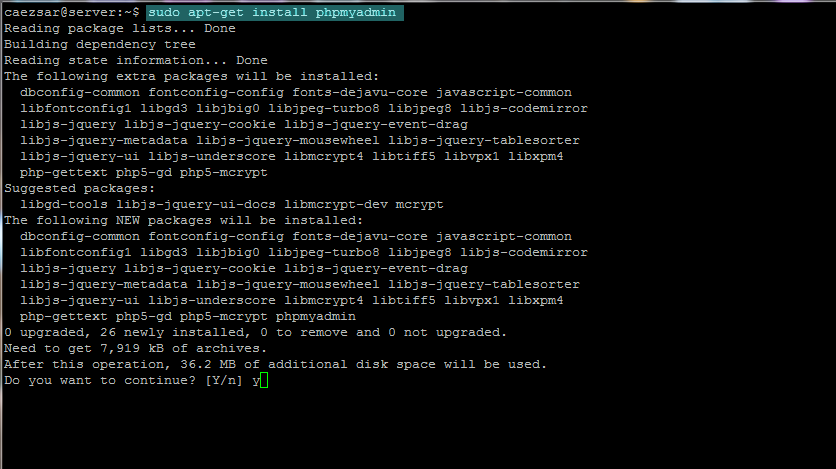
install phpmyadmin
During the installation process the installer will prompt you some questions in order to configure PhpMyAdmin with the correct settings. Choose apache2 as the server which will be automatically configured to run PhpMyAdmin, then choose No on Configure database for phpmyadmin with dbconfig-common as illustrated in the following screenshots.
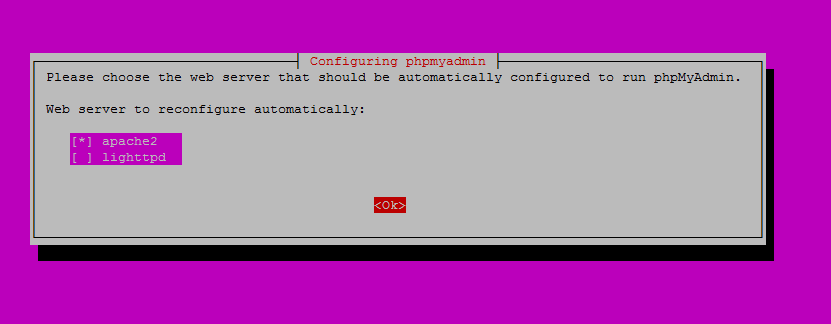
configure phpmyadmin with apache
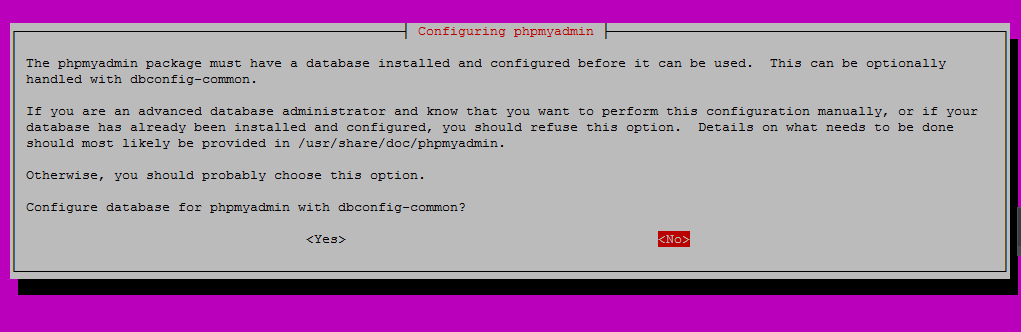
configure phpmyadmin without dbconfig-common
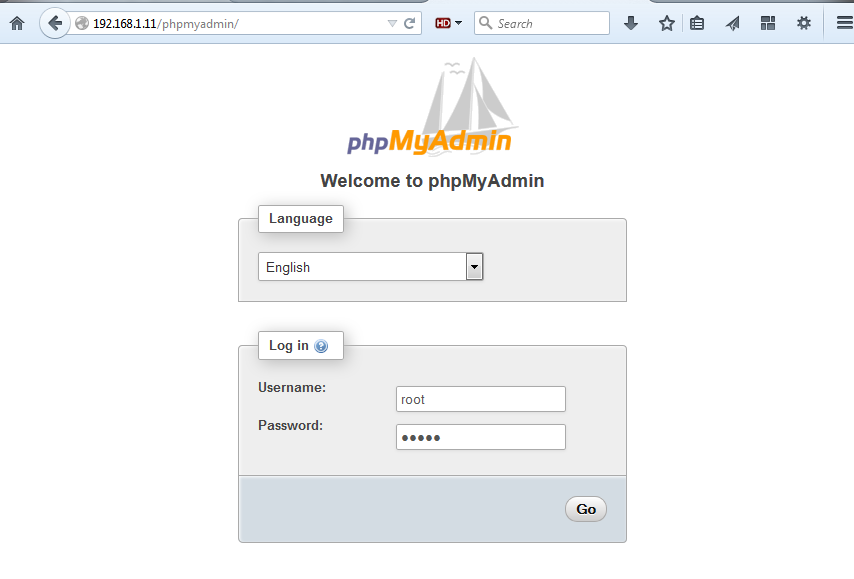
2. After the installation finishes you can access the PhpMyAdmin web interface by opening a browser at your server’s IP Address or domain name followed by the /phpmyadmin string as the below examples suggests.
http://192.168.1.11/phpmyadmin
http://domain.tld/phpmyadmin
visit phpmyadmin web interface
To log in on PhpMyAdmin interface use MySQL root username and the administrative password set for MySQL root user during the installation.
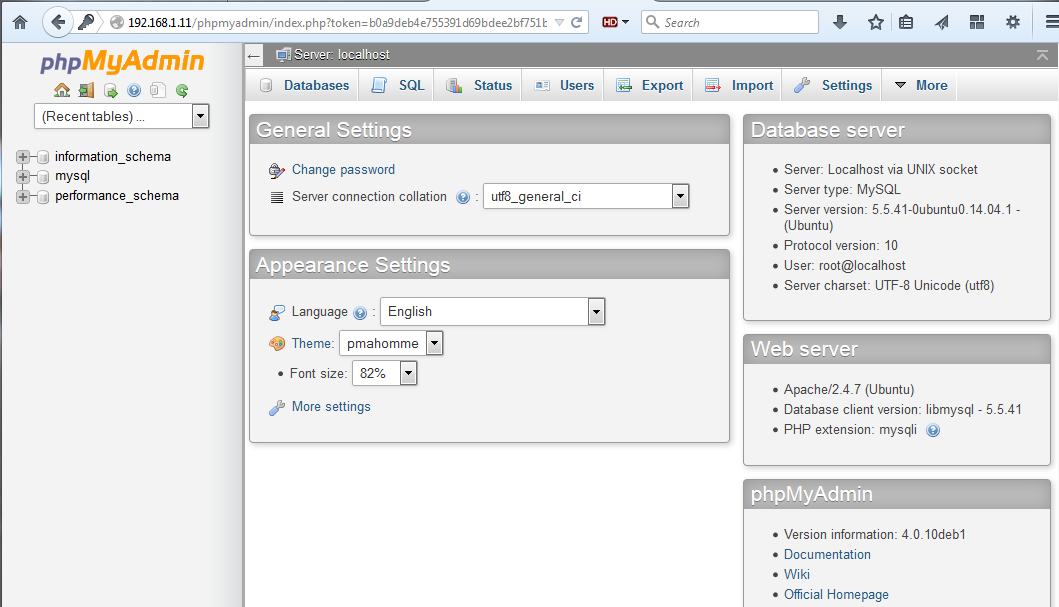
PhpMyAdmin interface
STEP TWO – Add Password for PhpMyAdmin Setup Web Tool
3. New installations of PhpMyAdmin provides a setup directory located on /usr/share/phpMyAdmin/setup through which you can create custom configurations for the web interface that will be written on /var/lib/phpmyadmin/config.inc.php file by issuing the pma-configure command. This setup directory requires server authentication in order to be accessed, but the directory admin password is not set by default on installation. To be able to access the phpmyadmin setup directory you must set a password for the default admin user at the following system path where the htpasswd file is located: /etc/phpmyadmin/htpasswd.setup.
To set the password use the htpasswd utility provided by apache2-utils package by issuing the following command:
sudo htpasswd /etc/phpmyadmin/htpasswd.setup admin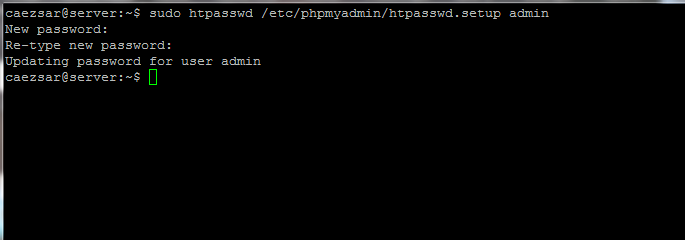
set phpmyadmin setup directory password
For security concerns you should delete the default admin user and add your custom username and password to htpasswd.setup file by issuing the following command:
sudo htpasswd -c /etc/phpmyadmin/htpasswd.setup your_username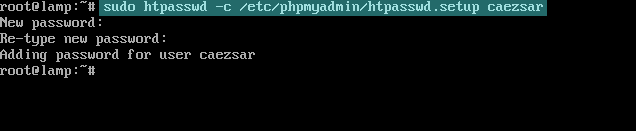
change htpasswd user
4. After the PhpMyAdmin Setup interface username and password had been set, visit the PhpMyAdmin Setup tool interface at the following URL address:
http://192.168.1.11/phpmyadmin/setup/
http://www.domain.tld/phpmyadmin/setup/
To log in to PhpMyAdmin Setup interface use the username and the password setup earlier.
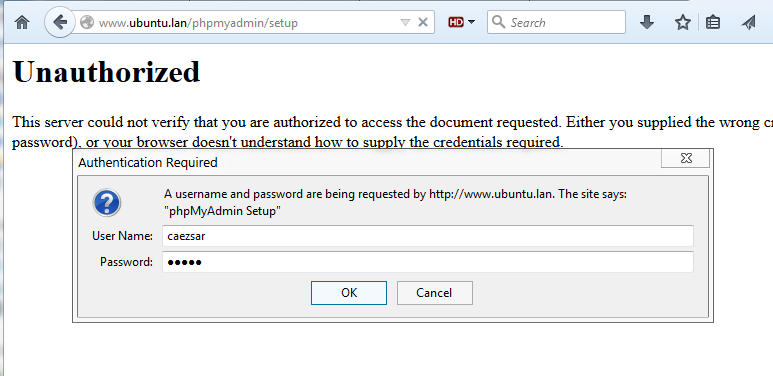
visit phpmyadmin setup
setup interface
STEP THREE – Change PhpMyAdmin Setup Permissions
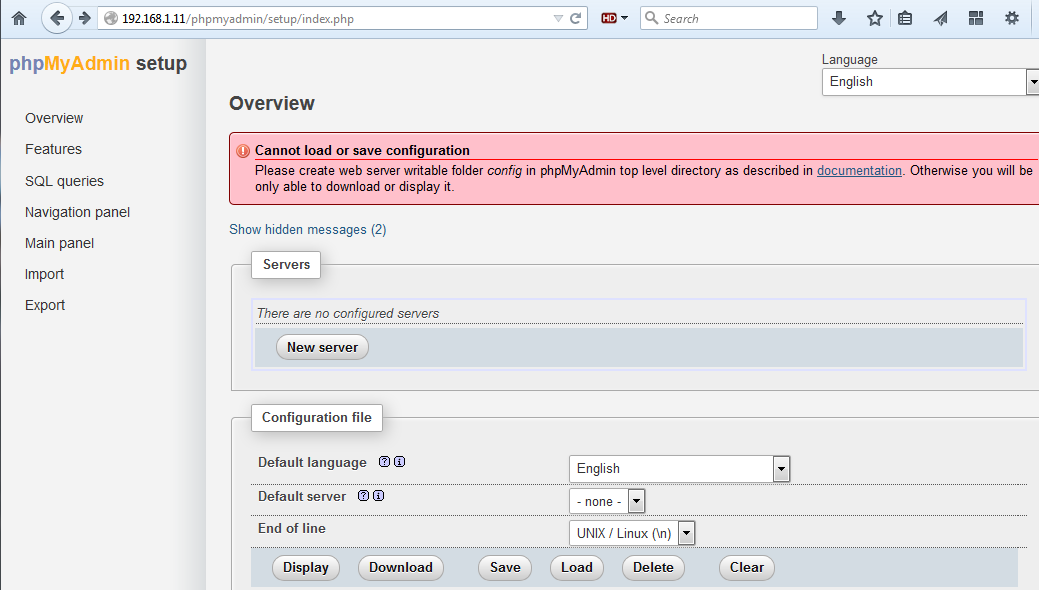
5. Once logged in to PhpMydmin Setup interface you will notice an error message saying that you don’t have permissions to access or modify Phpmyadmin configuration. The configurations made using this web tool will be written on /var/lib/phpmyadmin/config.inc.php file, file which is not writable by default due to security concerns. In order to use this tool and make custom PhpMyAdmin configurations run the below command to give writable permissions to /var/lib/phpmyadmin/config.inc.php file.
sudo pma-configure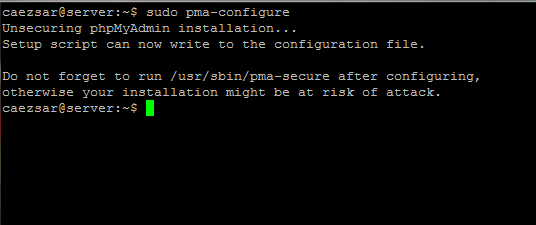
run pma-configure
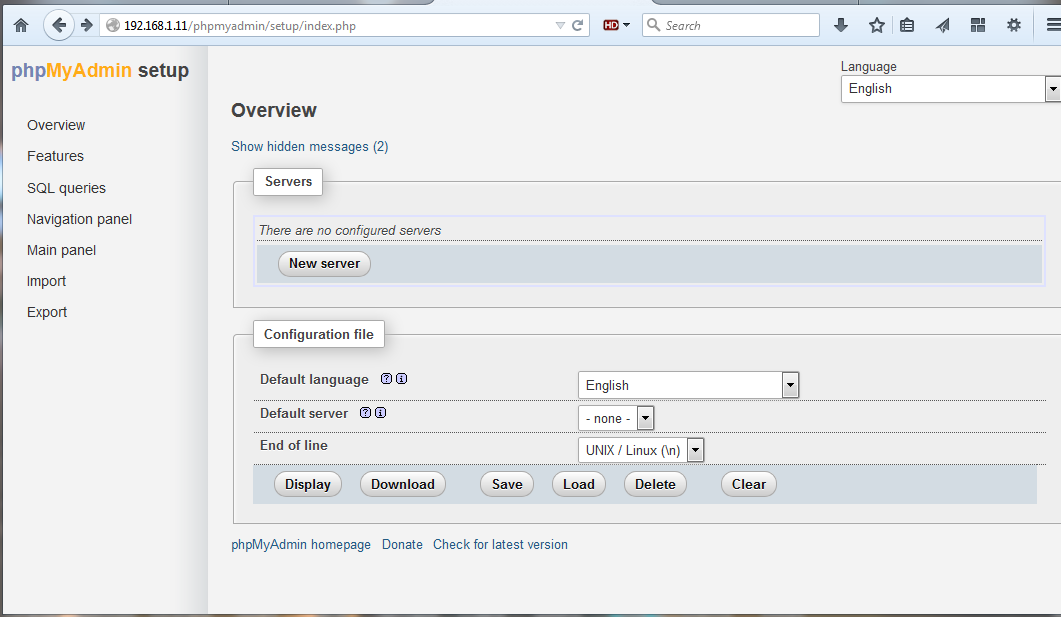
6. After the /var/lib/phpmyadmin/config.inc.php file has writable permissions, refresh your browser and start configure PhpMyAdmin with your custom settings. Remember that all saved settings will be overwritten to this file.
phpmyadmin setup
In case case there are some issues with the new settings and you can’t access PhpMyAdmin interface anymore you can always revert changes by blanking the file with the following command:
sudo cat /dev/null > /var/lib/phpmyadmin/config.inc.php7. When your done configuring the settings hit the Apply or Save button, then, secure PhpMyAdmin again by reverting permissions for /var/lib/phpmyadmin/config.inc.php file using the following command:
sudo pma-secure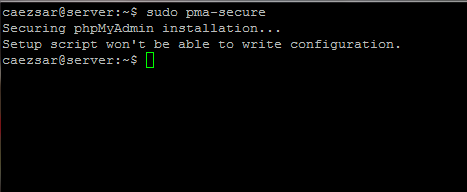
secue PhpMyAdmin
STEP FOUR – Create a PhpMyAdmin SSL Subdomain
8. During the installation of PhpMyAdmin the installer automatically creates and enables an Alias Apache configuration file which is located on /etc/apache2/conf-enabled/phpmyadmin.conf file. This configuration file provides as way through which the clients can access PhpMyAdmin web interface just by appending /phpmyadmin string at the end of every URL domain, subdomain or IP Address like in the below examples:
http://domain.tld/phpmyadmin
http://www.domain.tld/phpmyadmin
http://subdomain.domain.tld/phpmyadmin
http://server-IP/phpmyadmin
This type of behaviour can impose some seriously security issues because everyone can try using the /phpmyadmin string at the end of your domain name and scan the PhpMyAdmin web interface for already known vulnerabilities, or even try to brute-force the MySQL root password.
In order to change this behaviour you must crate a dedicated SSL subdomain through which you will access and manage phpmyadmin web interface by using the power of Apache Virtual Hosting.
So, before you start creating the virtual host for PhpMyAdmin, first assure that you disable Phpmyadmin Alias configuration by issuing the following commands:
sudo a2disconf phpmyadmin
sudo service apache2 restart
disable phpmyadmin configuration
9. Next, assuming that your domain is called ubuntu.lan and you want to access PhpMyAdmin web interface at phpadm.ubuntu.lan subdomain, go to your DNS server and add a CNAME or A record that will point to this specific subdomain. Then, create an Apache SSL Virtual Host configuration file for Phpmyadmin on sites-available path with the below server configurations by issuing the following command:
sudo nano /etc/apache2/sites-available/phpmyadmin-ssl.confphpmyadmin-ssl.conf file excerpt:
<IfModule mod_ssl.c>
    <VirtualHost *:443>
       ServerAdmin webmaster@localhost
       ServerName phpadm.lamp.lan
       DocumentRoot "/usr/share/phpmyadmin"

       ErrorLog ${APACHE_LOG_DIR}/phpmyadmin.lan-ssl-error.log
       CustomLog ${APACHE_LOG_DIR}/phpmyadmin.lan-ssl-access.log combined

       SSLEngine on
       SSLCertificateFile      /etc/ssl/certs/ssl-cert-snakeoil.pem
       SSLCertificateKeyFile   /etc/ssl/private/ssl-cert-snakeoil.key

	<Directory /usr/share/phpmyadmin>
		Options FollowSymLinks
		DirectoryIndex index.php

		<IfModule mod_php5.c>
	AddType application/x-httpd-php .php
	php_flag magic_quotes_gpc Off
	php_flag track_vars On
	php_flag register_globals Off
	php_admin_flag allow_url_fopen Off
	php_value include_path .
	php_admin_value upload_tmp_dir /var/lib/phpmyadmin/tmp
	php_admin_value open_basedir /usr/share/phpmyadmin/:/etc/phpmyadmin/:/var/lib/phpmyadmin/:/usr/share/php/php-gettext/:/usr/share/javascript/
		</IfModule>
	</Directory>

# Authorize for setup
<Directory /usr/share/phpmyadmin/setup>
    <IfModule mod_authn_file.c>
    AuthType Basic
    AuthName "phpMyAdmin Setup"
    AuthUserFile /etc/phpmyadmin/htpasswd.setup
    Require valid-user
    </IfModule>
</Directory>

# Disallow web access to directories that don't need it
<Directory /usr/share/phpmyadmin/libraries>
    Order Deny,Allow
    Deny from All
</Directory>
<Directory /usr/share/phpmyadmin/setup/lib>
    Order Deny,Allow
    Deny from All
</Directory>

            </VirtualHost>
</IfModule>
Replace ServerName directive to match your DNS record for PhpMyAdmin subdomain accordingly.
10. After you have created the PhpMyAdmin configuration file for Apache, activate the new virtual host and restart the Apache service in order to reflect changes by issuing the following commands:
sudo a2eniste phpmyadmin-ssl.conf
sudo service apache2 restart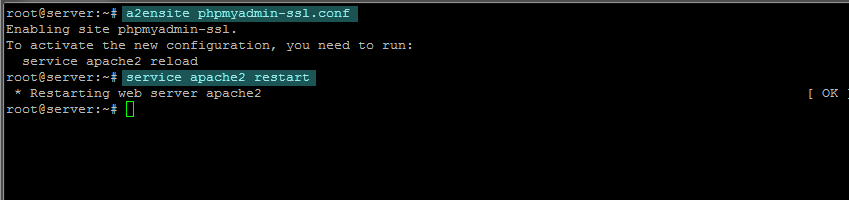
enable pphpmyadmin subdomain
11. Finally, you can access PhpMyAdmin interface by opening a browser and visiting your especially created subdomain (in this case is phpadm.ubuntu.lan) using the HTTPS protocol as illustrated on the below screenshot.
http://phpadm.ubuntu.lan
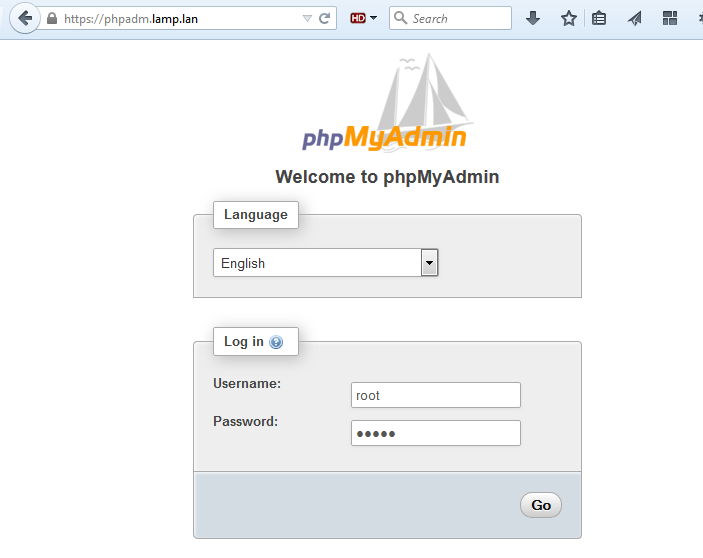
visit phpmyadmin SSL subdomain
That’s all! This are just a few security measures that you need to take in case you are not comfortable with administering MySQL server from command line and you want to use PhpMyAdmin web interface to interact with the database.